How to See Whats Taking Up Space on Windows
 Source: Windows Central
On Windows 10, you have several options to free up space on your computer. Although nowadays, laptops and desktops come up with drives featuring multiple terabytes of storage, we e'er discover a style to fill up them upward with documents, pictures, videos, apps, and games, causing the system to work slower, problems saving files, and many other issues.
If your device is running low on space, Windows 10 comes with tools similar Storage Sense, OneDrive Files On-Demand, Compact Os, NTFS compression, and others to delete unnecessary files, apps, and games, which can assistance to reclaim space, meliorate performance, and resolve problems during updates.
In this Windows 10 guide, we will walk you through the all-time ways to gratuitous up storage space on your estimator to store more than files and install characteristic updates without issues.
- Free upwards space immigration Recycle Bin on Windows ten
- Costless up space removing junk files with Storage Sense on Windows 10
- Complimentary up space deleting temporary files using Disk Cleanup on Windows 10
- Free upwardly space using OneDrive files on-demand on Windows 10
- Gratuitous up space removing non-essential apps and games on Windows x
- Free up space trasnfering files to external drive
- Gratuitous up space using NTFS compression
- Gratis up space disabling Hibernation on Windows 10
- Free upwardly space compressing installation footprint of Windows 10
- Gratuitous upwardly space rebuilding search indexer on Windows 10
- Free up space deleting users no longer sharing device on Windows ten
- Free up space disabling Reserved Storage on Windows x
1. Costless up space clearing Recycle Bin on Windows ten
Windows ten doesn't erase the files from the hard drive when y'all delete them. Instead, they are relocated to the Recycle Bin and marked for deletion to give you the hazard to recover the files if you need them back. However, since the Recycle Bin can grow large over time, emptying its contents is the first thing you tin practice to free upwards infinite.
On Windows 10, when deleting files, the system does not erase them from the difficult drive. Instead, they are placed inside the Recycle Bin if you need them back. However, depending on how the characteristic is configured, over time, the Recycle Bin tin can take up a lot of infinite, which means that emptying the bin is 1 of the outset actions you lot should take to regain valuable storage infinite.
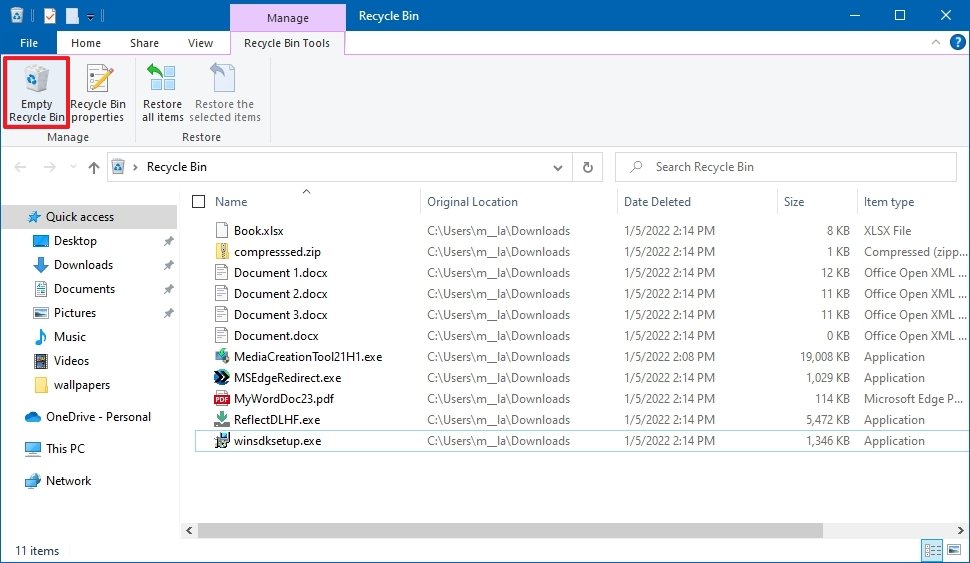
To empty the Recycle Bin to regain storage space on Windows ten, use these steps:
- Open up Start.
-
Search for Recycle Bin and click the top result to open up the app.
Quick tip: If the app does not appear in the event, you lot can open File Explorer (Windows key + Eastward) and then blazon Recycle Bin and press Enter in the address bar.
- Click the Recycle Bin Tools tab.
-
Click the Empty Recycle Bin button.
 Source: Windows Key
 - Click the Yeah button.

Once you lot complete the steps, the organization volition free upwardly around ten per centum of the bulldoze capacity (assuming the Recycle Bin is full).
Change Recycle Bin settings
Windows 10 reserves 10 percent of the available space for deleted files. Once the threshold is reached, the arrangement will automatically delete files from the oldest to the newest. If you want, information technology's possible to suit how much space the organization should use for the Recycle Bin.
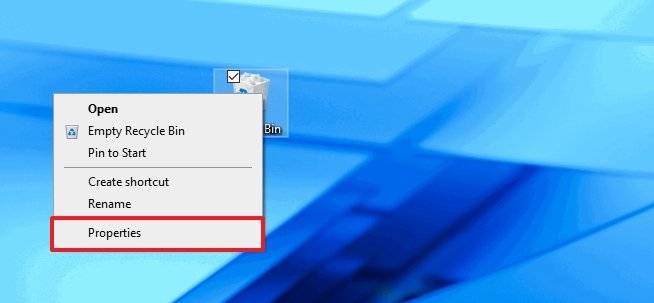
To reduce the space usage for the Recycle Bin, use these steps:
- Use the Windows + D keyboard shortcut to view the desktop.
-
Correct-click the Recycle Bin icon and select the Properties option.
 Source: Windows Cardinal
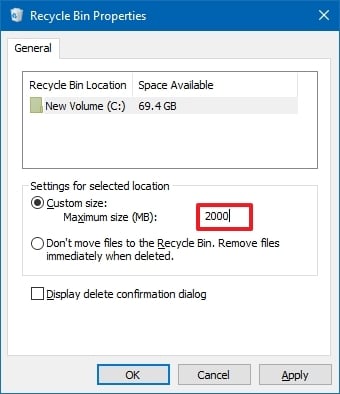
 - If you lot take multiple partitions, select the Recycle Bin location you want to configure. For instance, Local Deejay (C:) is the drive where Windows 10 is installed.
- Under the "Settings for selected location" section, select the Custom size option.
-
In the "Maximum size (MB)" field, specify the maximum hard drive space in megabytes that Recycle Bin tin utilise on the item partition.
 Source: Windows Primal
 - (Optional) Bank check the Don't motility files to the Recycle Bin. Remove files immediately when deleted option if you want to delete the files from the drive skipping the Recycle Bin to minimize storage usage.
- Click the Apply button.
- Click the OK Button.


Afterwards yous complete the steps, the Recycle Bin volition exist able to keep more or fewer files from a particular location, depending on your configuration.
2. Free up space removing junk files with Storage Sense on Windows 10
Storage Sense is a feature that allows you to delete different types of junk files (including previous installation files subsequently an upgrade and temporary files) to free up space on the chief and secondary drives to make room to store other files and meliorate bulldoze efficiency.
Enable Storage Sense
Although you tin use Storage Sense manually, information technology'due south possible to enable the feature to run maintenance automatically to help avoid running out of space quickly.
To enable Storage Sense on Windows 10, use these steps:
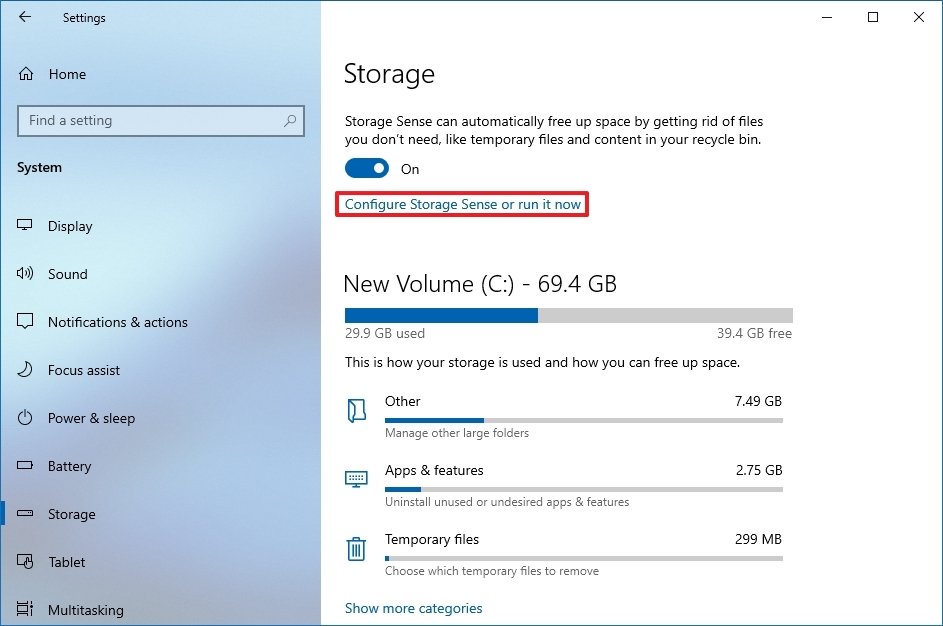
- Open Settings.
- Click on Organization.
- Click on Storage.
-
Under the "Storage" department, click the Configure Storage Sense or run it now pick.
 Source: Windows Primal
 - Plough on the Storage Sense toggle switch.
-
Apply the "Run Storage Sense" drop-down carte du jour and select the best pick for your situation:
- Every twenty-four hours.
- Every week.
- Every month.
- During depression free disk space (recommended).
 Source: Windows Central


One time you complete the steps, Storage Sense will run automatically at the schedule you specified to free up infinite and ameliorate storage performance.
The option to enable the characteristic is as well bachelor from the "Storage" page. However, using this pick only activates the default settings. Utilizing the Storage Sense settings page lets you lot configure how the feature should remove unnecessary content.
Delete unnecessary files with Storage Sense
To complimentary up space using Storage Sense, employ these steps:
- Open Settings.
- Click on Organization.
- Click on Storage.
-
Under the "Storage" section, click the Configure Storage Sense or run it at present option.
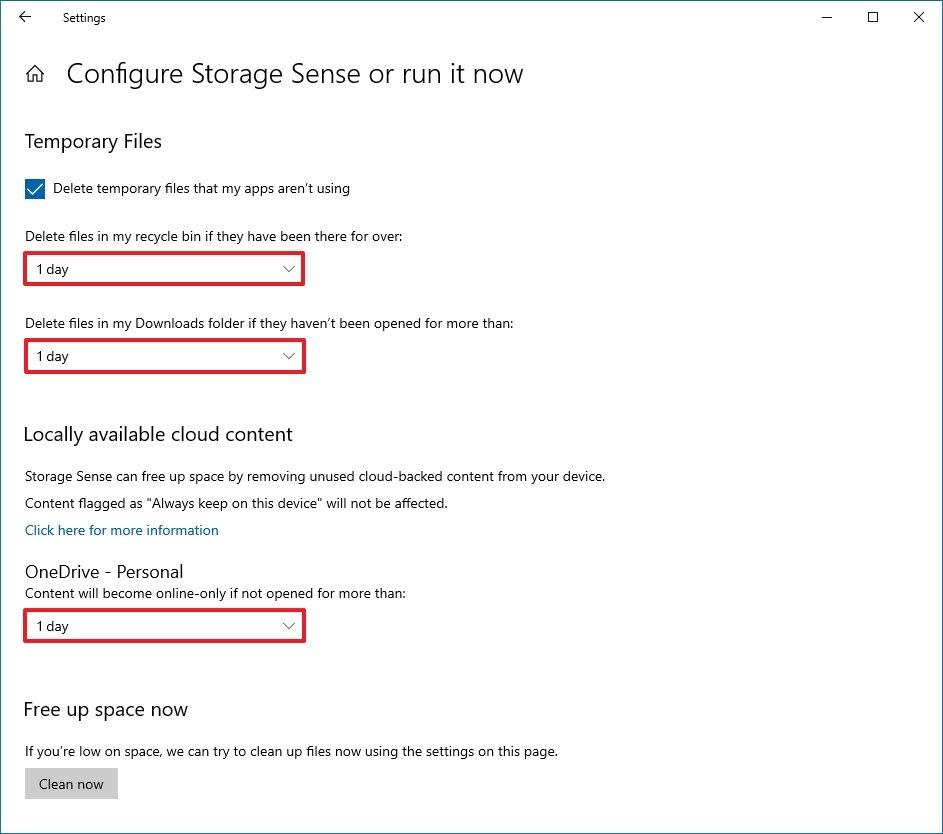
Source: Windows Central - Under the "Temporary Files" section, cheque the Delete temporary files that my apps aren't using option.
- Use the Recycle Bin drop-down carte du jour to specify how to articulate already deleted files yous do non need.
-
Utilise the Downloads driblet-down bill of fare to specify how to clean up downloaded files.
Quick tip: If you need to delete the most files, use the ane day option. The Downloads folder may comprise valuable files you may take downloaded from the internet, which means that it is recommended to backup those files manually before running the characteristic.
-
Under the "Locally available deject content" department, utilize the driblet-down carte du jour to specify how long OneDrive content synced to the device becomes online-only.
 Source: Windows Fundamental
 Quick note: This option is part of OneDrive Files On-Demand that allows yous to access your documents, pictures, videos, and other files using File Explorer without needing to sync them to reduce the space usage. When the device is running low on space, y'all tin can utilise it to brand files only available in the cloud. Y'all will notwithstanding run into your files, merely their content will only download when you demand them.
-
Under the "Free up space now" section, check the Delete previous versions of Windows option (if applicative).
Quick note: This option can gratuitous up close to 20GB of space, only the storage will vary from system to system.
- Click the Clean now button.

Storage Sense will run and delete unnecessary files from the computer to reclaim more infinite after completing the steps.
Delete temporary files with Storage Sense
Storage Sense as well deletes temporary organization and apps files that can help to reclaim several gigabytes of infinite on your Windows ten device.
To delete temporary files from the device, use these steps:
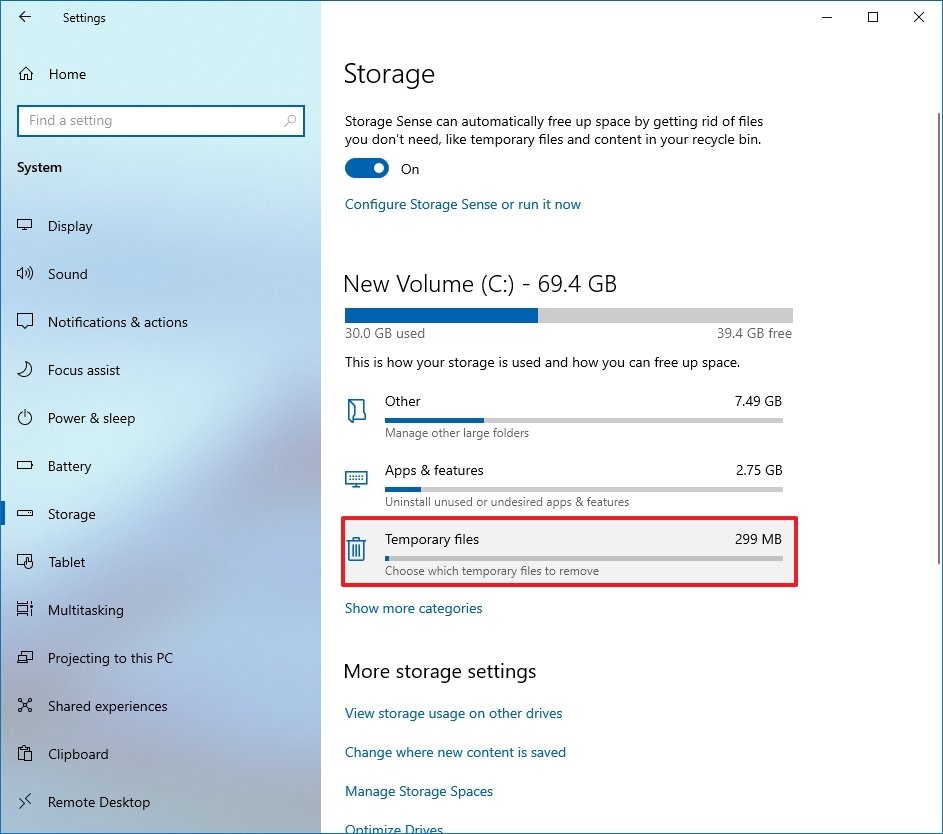
- Open Settings.
- Click on System.
- Click on Storage.
-
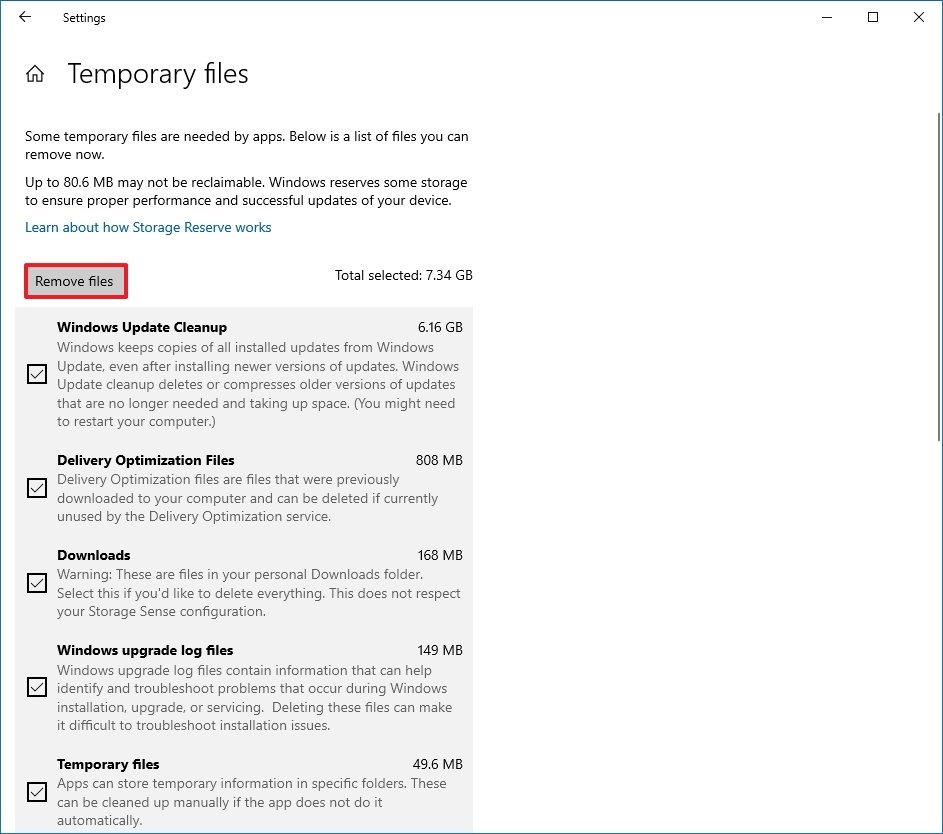
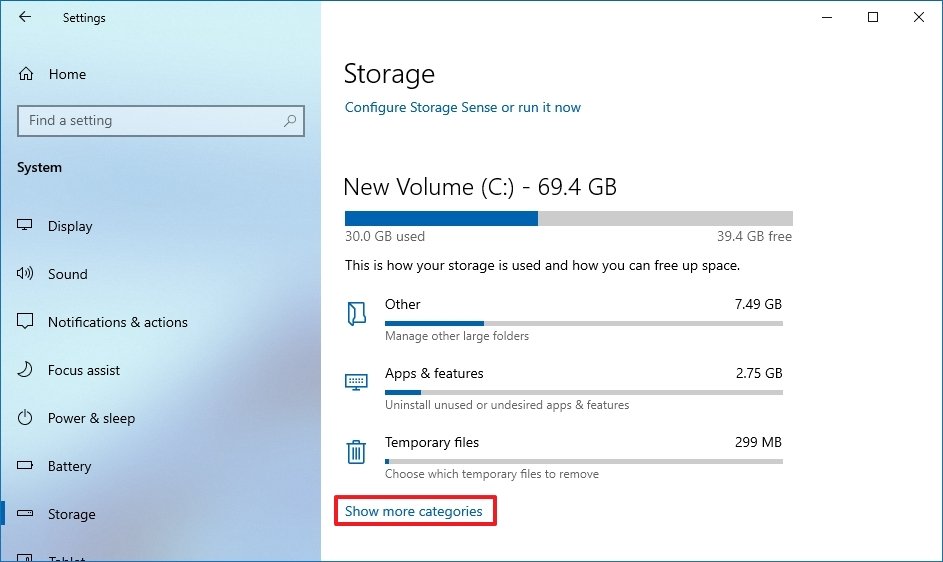
Nether the "Local Disk (C:)" section, click the Temporary files item. (If the detail is not bachelor, click the Show more categories option.)
 Source: Windows Central
 -
Check all the items you desire to remove to optimize the space. For case:
- Downloads.
- Windows Update Cleanup.
- Recycle Bin.
- Delivery Optimization Files.
- Thumbnails.
- Microsoft Defender Antivirus.
- Temporary Cyberspace Files.
- Temporary files.
- Windows mistake reports and feedback diagnostics.
- DirectX Shader Cache.
- Previous Windows installation(southward).
- Temporary Windows installation files.
Quick tip: The available items may differ on your installation. If yous want to select the Downloads item, before clearing these files, make sure to sympathise that this choice will erase everything in that folder.
-
Click the Remove files button.
 Source: Windows Central


After you lot consummate the steps, the selected files will be deleted permanently, freeing upwards space for more important files.
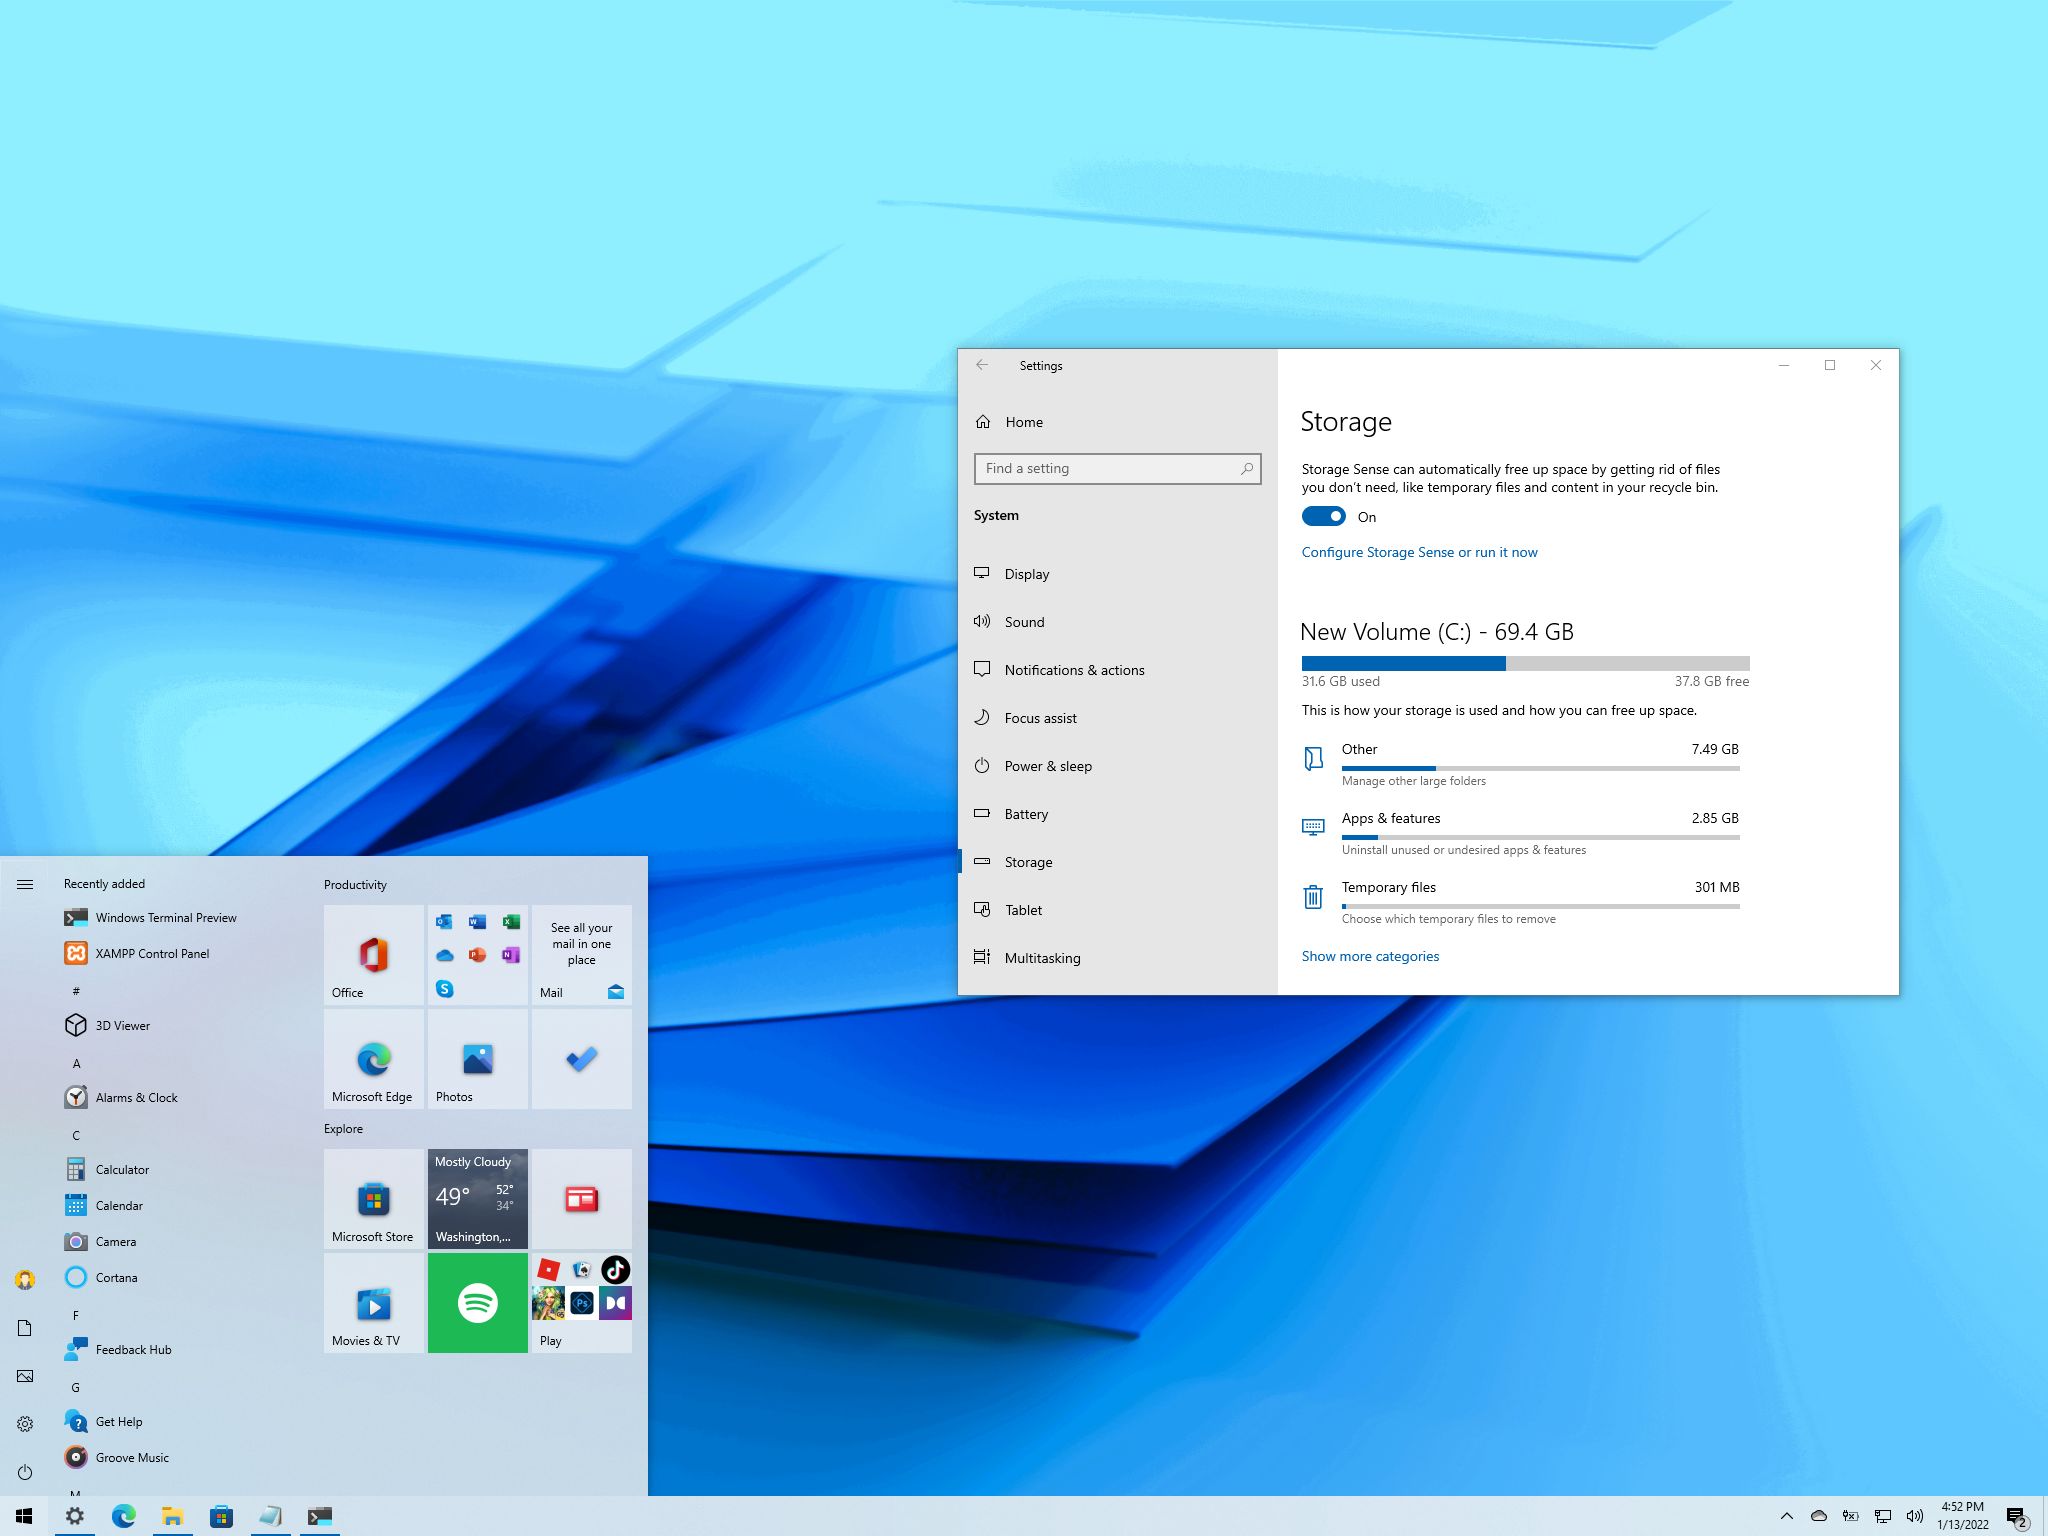
View storage usage on Windows 10
On Windows eleven, Storage Sense is also a peachy tool to help y'all sympathize which files use the most space to make up one's mind the files you can make clean up.
To view the storage usage on Windows 10, utilize these steps:
- Open up Settings.
- Click on Organization.
- Click on Storage.
-
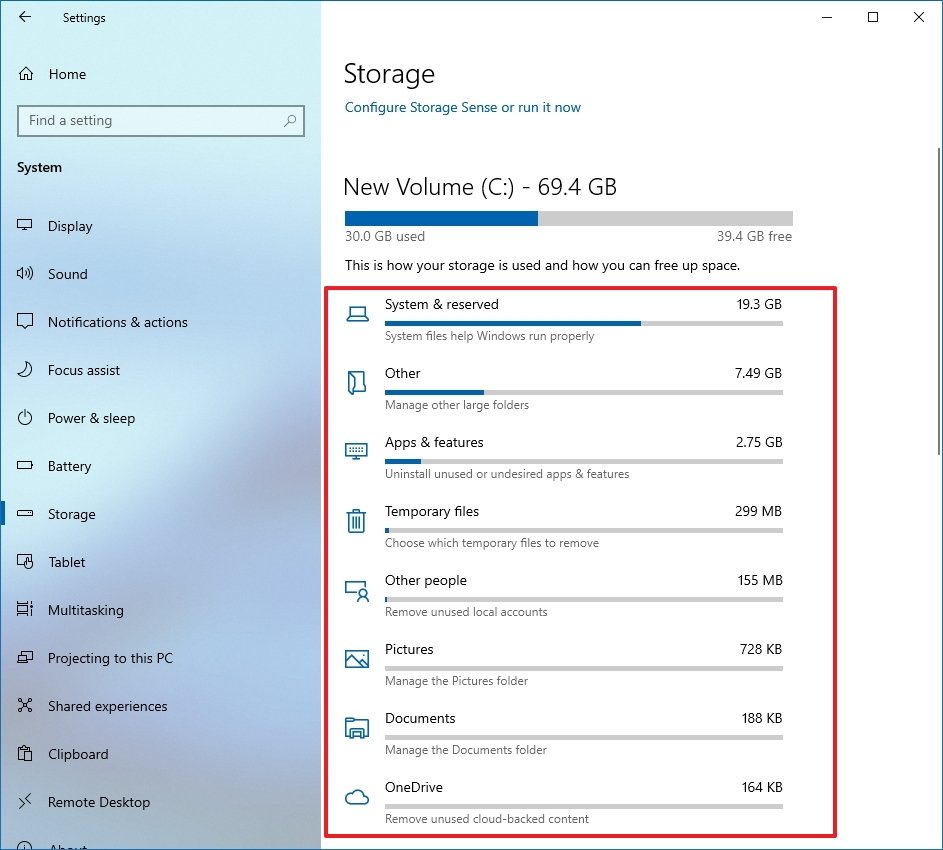
Nether the "Local Disk C:" section, click the Prove more categories option.
 Source: Windows Fundamental
 -
See how the storage is being utilized.
 Source: Windows Central
 - Select each category to see even more details and actions y'all can accept to gratuitous up space on Windows 10.


Once you lot complete the steps, yous will find out the storage usage and focus areas to free up space. For example, inside the System & reserved category, you will see how much space the installation, virtual memory, hibernation files, and organization restore are using, and the amount of space the arrangement is reserving for updates.
If y'all have multiple drives, under the "More storage settings" section, click the View storage usage on other drives option to open the page that lists all the drives on the device.
3. Free up space deleting temporary files using Disk Cleanup on Windows 10
On Windows 10, it's still possible to clear up space using the legacy Disk Cleanup tool.
Remove temporary files with Deejay Cleanup
To use Disk Cleanup to delete temporary files on Windows ten, employ these steps:
- Open Start.
- Search for Disk Cleanup and select the top outcome to open the app.
- Use the "Drives" drop-down menu and select the (C:) drive (if applicable).
- Click the OK button.
-
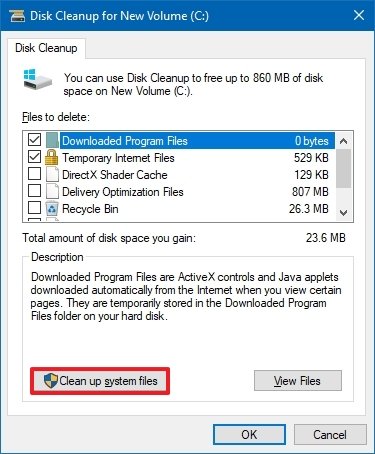
Click the Cleanup system files push.
 Source: Windows Central
 - Use the "Drives" drop-down card and select the (C:) drive.
- Click the OK button.
-
Bank check all the contents y'all want to delete:
- Windows Update Cleanup.
- Microsoft Defender Antivirus.
- Downloaded Plan Files.
- Temporary Internet Files.
- Windows fault reports and feedback diagnostics.
- DirectX Shader Cache.
- Delivery Optimization Files.
- Device commuter packages.
- Language Resources Files.
- Previous Windows installation(s).
- Recycle Bin.
- Temporary files.
- Thumbnails.
-
Click the OK button.
 Source: Windows Central
 - Click the Delete Files button.


After you complete the steps, those unnecessary files will be deleted from the device, freeing upward hard drive space.
Delete System Restore and Shadow Copies using Disk Cleanup
If you lot use Organisation Restore and the Shadow Copies features, y'all tin also delete older files to repossess additional space on Windows 10.
To delete one-time system restore points, use these steps:
- Open Commencement.
- Search for Disk Cleanup and select the summit event to open up the app.
- Use the "Drives" drop-downwards card and select the (C:) drive (if applicable).
- Click the OK push button.
-
Click the Cleanup system files button.
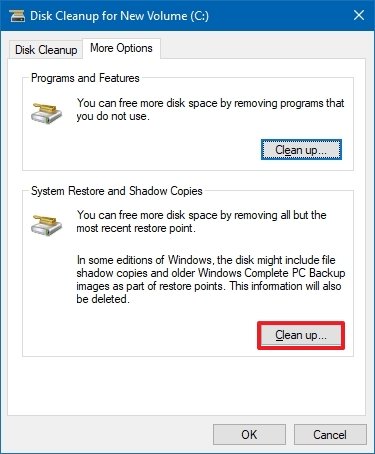
Source: Windows Central - Click the More Options tab.
-
Under the "Organization Restore and Shadow Copies" section, click the Clean up button.
 Source: Windows Central
 - Click the Delete button.

After you complete the steps, you will reclaim some additional infinite to store more important content.
4. Complimentary upwardly space using OneDrive files on-need on Windows 10
You can also apply the OneDrive Files On-Demand feature to make files bachelor online but manually to regain some space back on your computer.
Enable OneDrive Files On-Demand
On Windows 10, the Files On-Demand feature should be already enabled in OneDrive, but if information technology is non, utilize these steps:
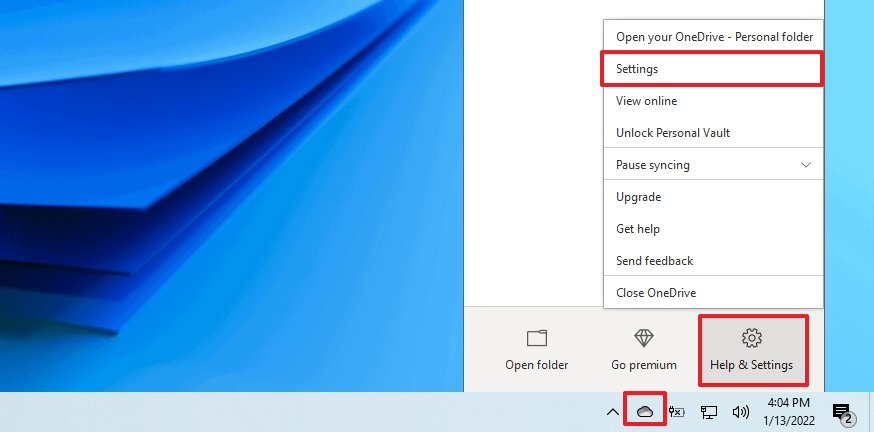
- Click the OneDrive icon in the bottom-right corner of the taskbar.
- Click the Help & Settings selection.
-
Click the Settings choice.
 Source: Windows Cardinal
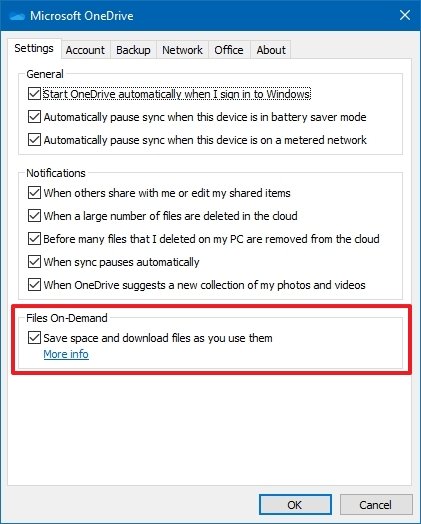
 - Click the Settings tab.
-
Nether the "Files On-Demand" department, check the Save infinite and download files as y'all use them choice.
 Source: Windows Key
 - Click the OK button.


One time you lot complete the steps, you can move files to the OneDrive folder and make them bachelor merely online to complimentary up space (see steps below).
Make files bachelor online-only
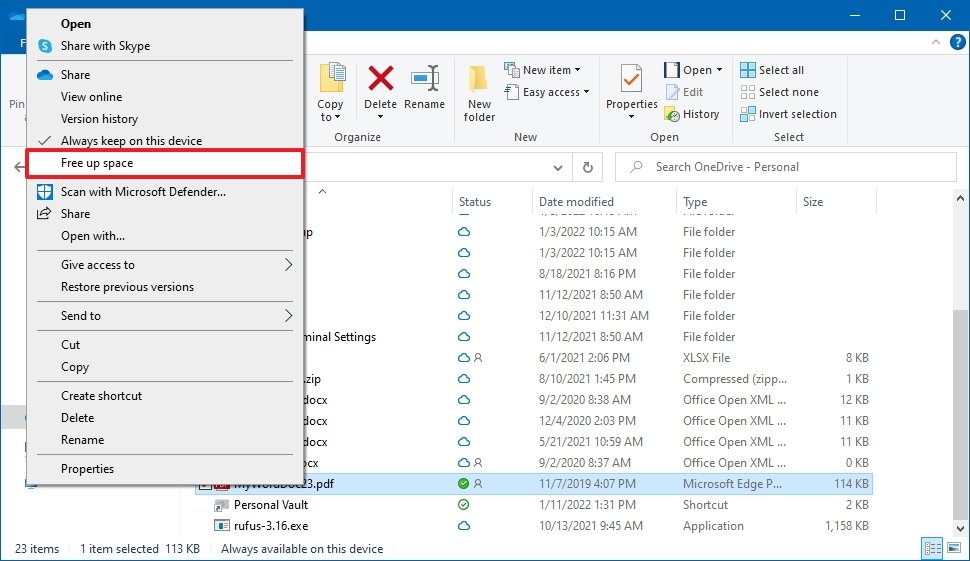
To make local files available online-just with OneDrive, use these steps:
- Open File Explorer.
- Select the OneDrive binder from the left pane.
-
Select the files and folders taking upwards the virtually space.
Quick tip: You lot can select all files using the Ctrl + A keyboard shortcut by selecting the outset file, holding downwards the Shift key, selecting the last files, or property downward the Ctrl key and selecting each file individually.
-
Right-click the pick and choose the Gratuitous upwardly infinite option.
 Source: Windows Central

Afterwards you complete the steps, you will exist able to access all of your content using File Explorer, merely you lot will only exist able to open them with an net connection. In addition to making synced files available only with an net connection, you tin can free up even more space past moving other files to the OneDrive binder and using the above steps to make them available on-demand.
The complimentary version of OneDrive simply allows y'all to shop up to 5GB of data. All the same, you tin always get a Microsoft 365 subscription to lift the limit to 1TB. In addition to the 1TB of storage, the subscription besides gives yous access to all the Function apps and services similar Microsoft Teams and Family Rubber.
Get subscribed
![]()
Microsoft 365
Microsoft 365 gives you lot full access to all the apps and perks, such as 1TB OneDrive storage and Skype minutes. You can as well install Give-and-take, Excel, PowerPoint, Outlook, and other apps on up to five devices, and depending on the subscription, you tin can share the business relationship with upward to six people.
v. Free upwards space removing non-essential apps and games
Some other way you can reclaim storage infinite is uninstalling apps you no longer need or rarely use. Games as well take upwards a lot of space, which means that keeping the catalog to a minimum can significantly reduce infinite usage while improving gaming performance at the aforementioned time.
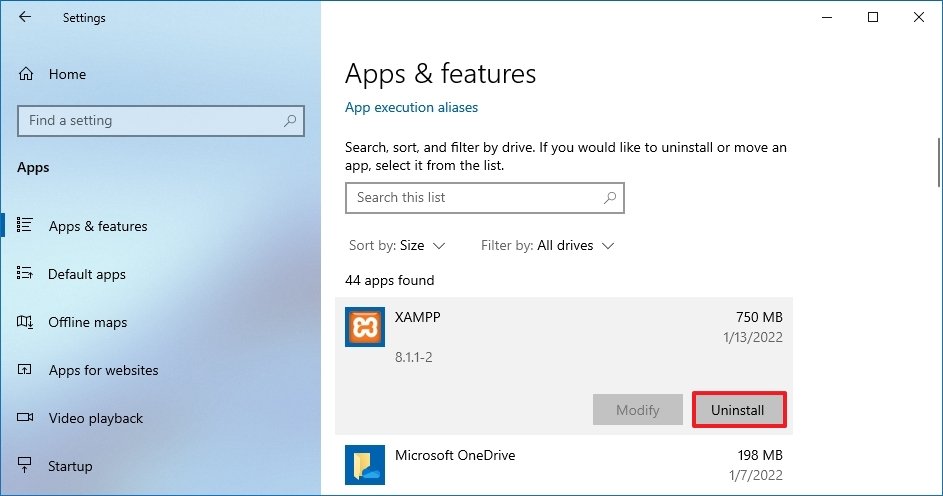
To uninstall apps and games on Windows 10, utilise these steps:
- Open Settings.
- Click on Apps.
- Click on Apps & features.
- Apply the "Sort by" filter and select the Size view to quickly identify the apps and games using the most space.
- Select the particular to remove.
-
Click the Uninstall push.
 Source: Windows Central
 - Click the Uninstall button once more.
- Continue with the on-screen directions (if applicable).

Once you complete the steps, repeat the aforementioned instructions to remove additional apps and games from the computer.
If you have previously enabled the Windows Subsystem for Linux, y'all may also have 1 or multiple distros even so installed on your computer. You can always uninstall them to free up infinite on Windows 10.
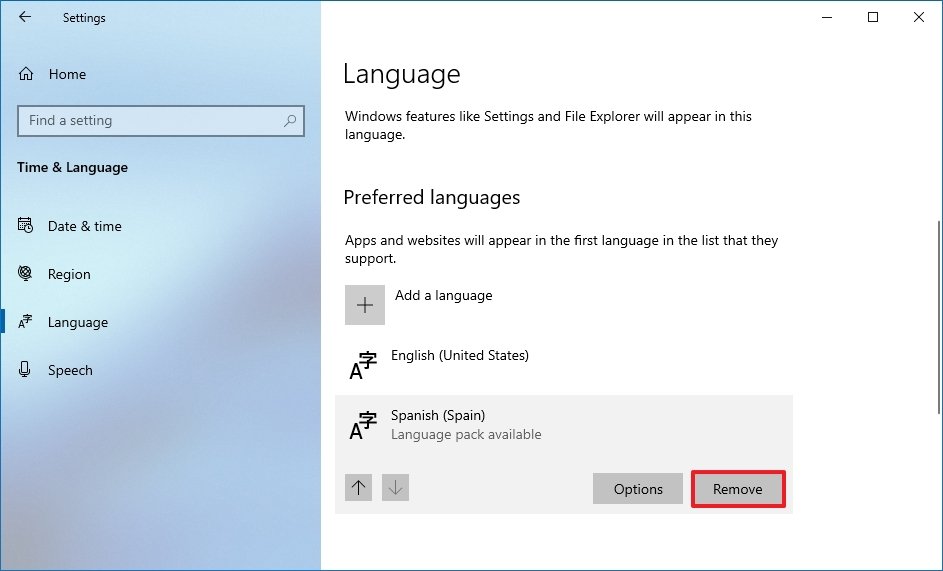
Delete unused languages
Secondary languages tin too use some of the storage. If you are not using the other languages, remove them to make more than room for additional files.
To uninstall languages on Windows x, use these steps:
- Open up Settings.
- Click on Fourth dimension & Language.
- Click on Linguistic communication.
- Select the language to remove.
-
Click the Remove button.
 Source: Windows Central

After you complete the steps, you lot may need to repeat the instructions to delete boosted languages every bit necessary.
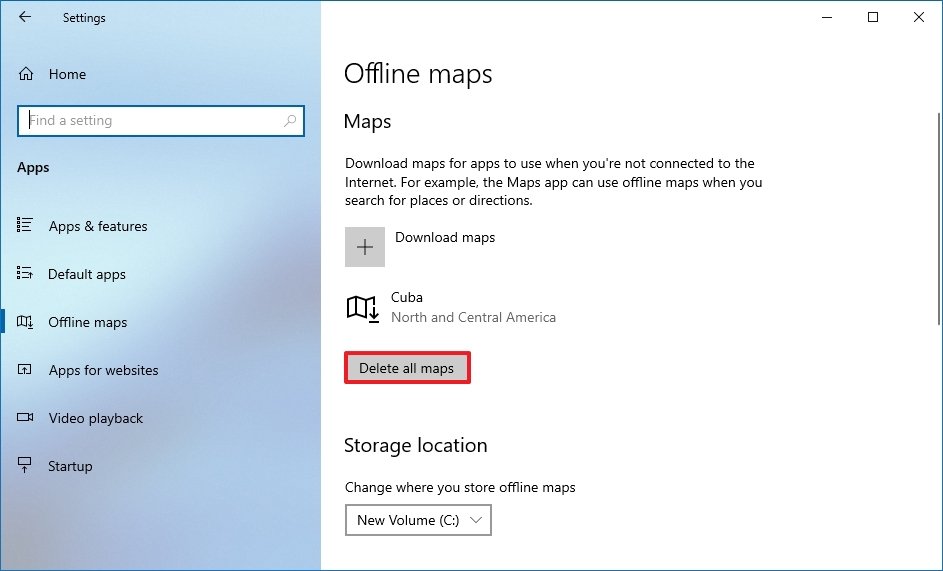
Delete maps
If you use the Windows 10 maps feature, yous can remove the offline maps to clear up some boosted space on the computer.
To remove downloaded maps packages, use these steps:
- Open Settings.
- Click on Apps.
- Click on Offline maps.
-
Click the Delete all maps button.
 Source: Windows Central
 - Click the Delete all button.

Once y'all complete the steps, the offline maps volition be removed to make more space available.
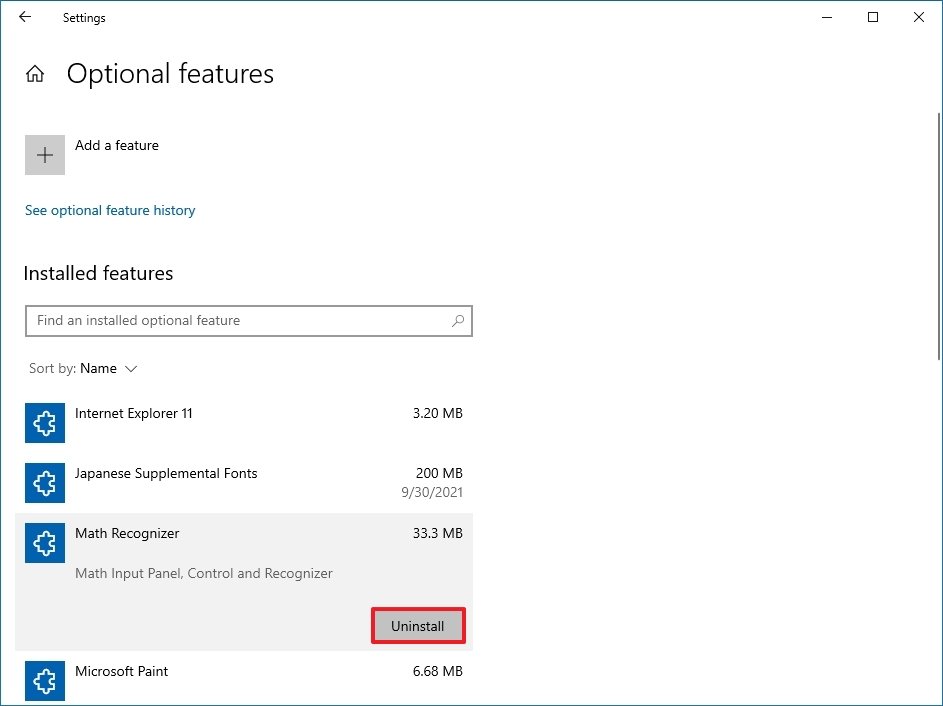
Uninstall optional features
Optional features (such equally Windows Media Player, Windows Hi Face, Math Recognizer, Windows Fax and Scan, and others) besides accept upward storage, and you can remove them to regain some extra space.
To remove optional features, apply these steps:
- Open Settings.
- Click on Apps.
- Click on Apps & features.
-
Nether the "Apps & features" section, click the Optional features selection.
 Source: Windows Central
 - Click the "Sort past" bill of fare and select the Install Size option to determine the feature using the most space.
- Select the feature to remove.
-
Click the Uninstall button.
 Source: Windows Primal


After yous complete the steps, you may need to echo the instructions to remove other features you may no longer demand.
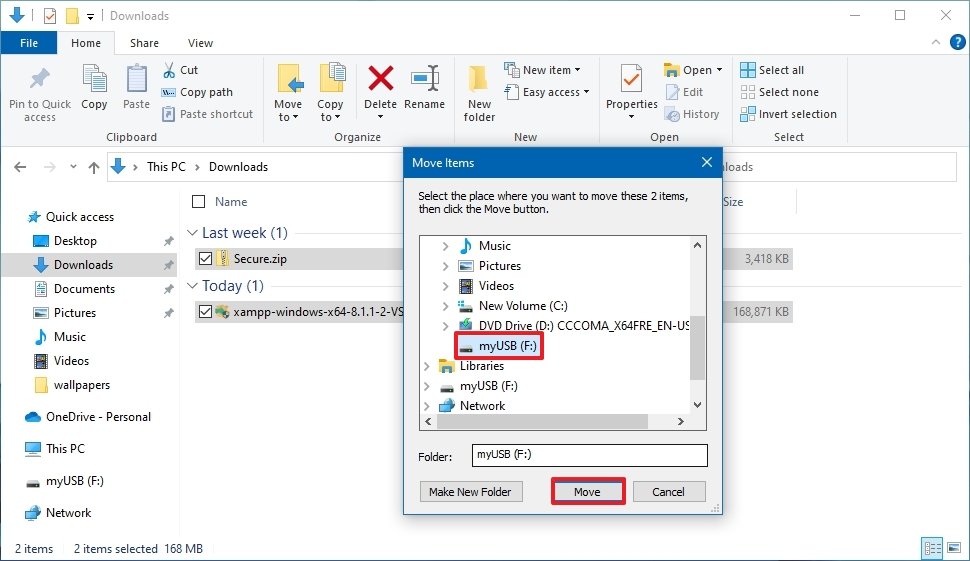
half dozen. Free up space transferring files to external bulldoze
If the figurer even so does not have enough space, you tin can add an external drive to move files over the new location. You tin can even configure the system to brand the external storage the default location to save files.
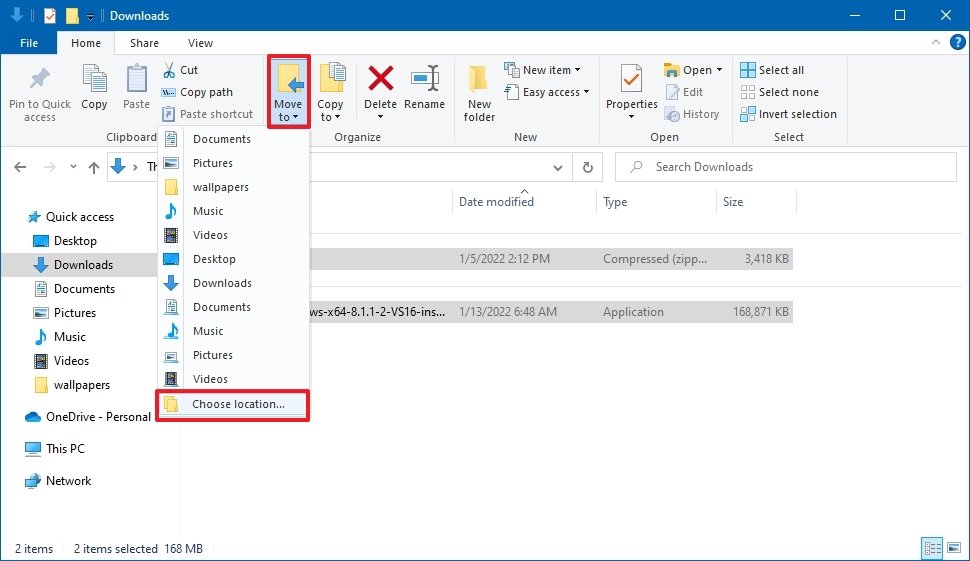
Transfer local files to external drive
To transfer existing files to an external storage, connect the bulldoze y'all will dedicate to the estimator, and then use these steps:
- Open File Explorer.
- Browse to the folder with the content taking the well-nigh space.
- Select the items to move.
-
Click the Movement to push from the "Home" tab.
 Source: Windows Central
 - Select the Cull location option.
-
Select the external storage as the new destination.
Quick tip: If you desire to continue files organized, you tin apply the available pick to create a new folder to store the files in the new location.
-
Click the Move button.
 Source: Windows Fundamental


Afterward you complete the steps, you may need to repeat the instructions to move boosted files and folders to a new location to reduce the storage usage in the drive running out of space.
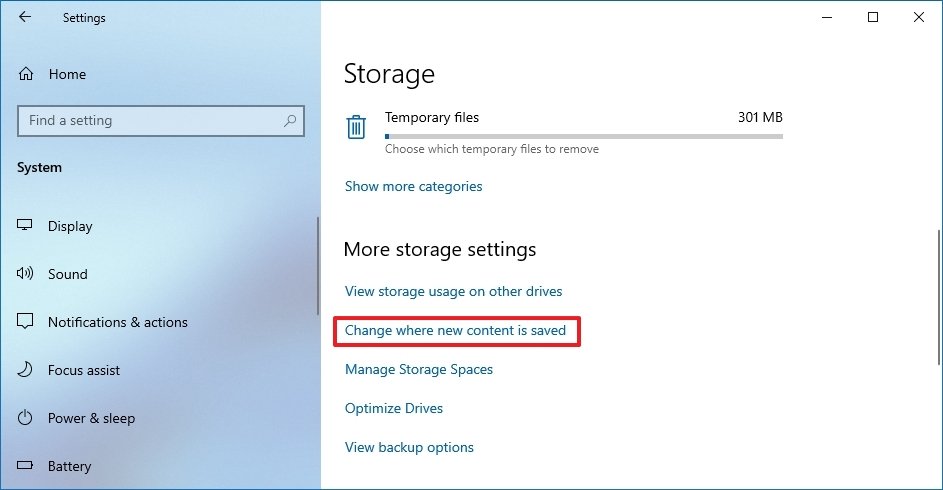
Configure external drive as new save location
To allow the arrangement to save files and install apps on an external bulldoze automatically, employ these steps:
- Open Settings.
- Click on Organization.
- Click on Storage.
-
Under the "More than storage settings" section, click the Change where new content is saved option.
 Source: Windows Central
 -
Use the drop-down menus and select the new location to salve files automatically for each content type.
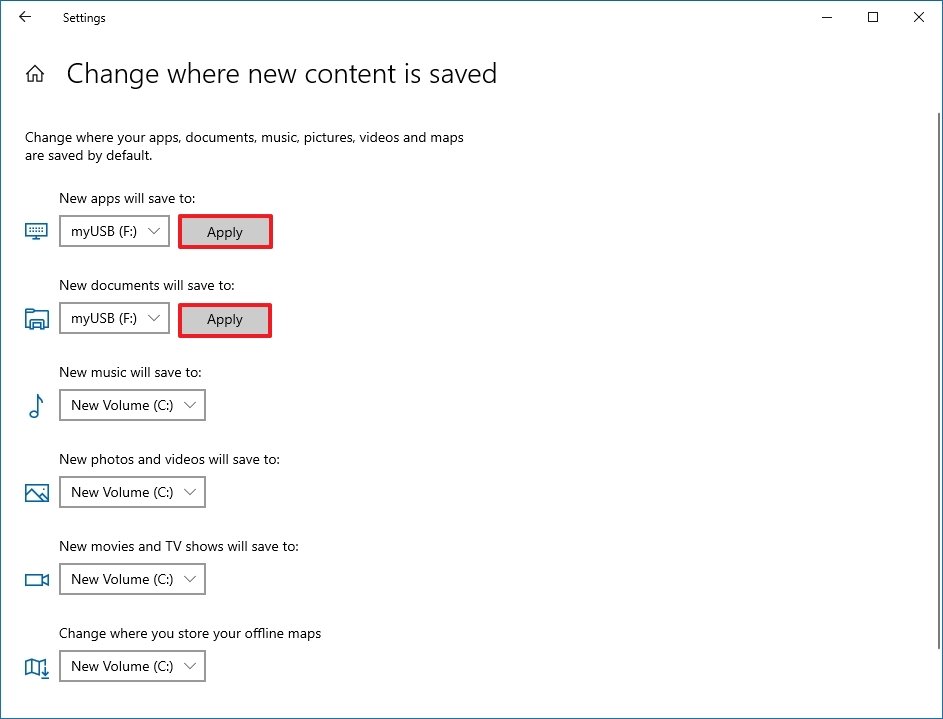 Source: Windows Central
 - Use the "New apps volition be save to" drop-down menu to select the drive to install future apps by default.
- Click the Apply push button for each setting.


Once you complete the steps, files, and apps from the Microsoft Shop will salvage in the new location you specified.
Relocate apps and games to new bulldoze
On Windows 10, you lot can move near apps and games from the Microsoft Store already installed on the computer to an external storage, which can assist reduce storage usage on the system drive.
To transfer existing apps and games to some other bulldoze, connect the external storage to the computer, and then use these steps:
- Open up Settings.
- Click on Apps.
- Click on Apps & features.
- Use the "Sort past" filter and select the Size view to quickly identify the apps and games using the well-nigh space.
- Select the item to relocate.
- Click the Move button. (If the option is not available, the transfer characteristic is not bachelor for that particular item.)
-
Use the drop-downward menu to select the new location.
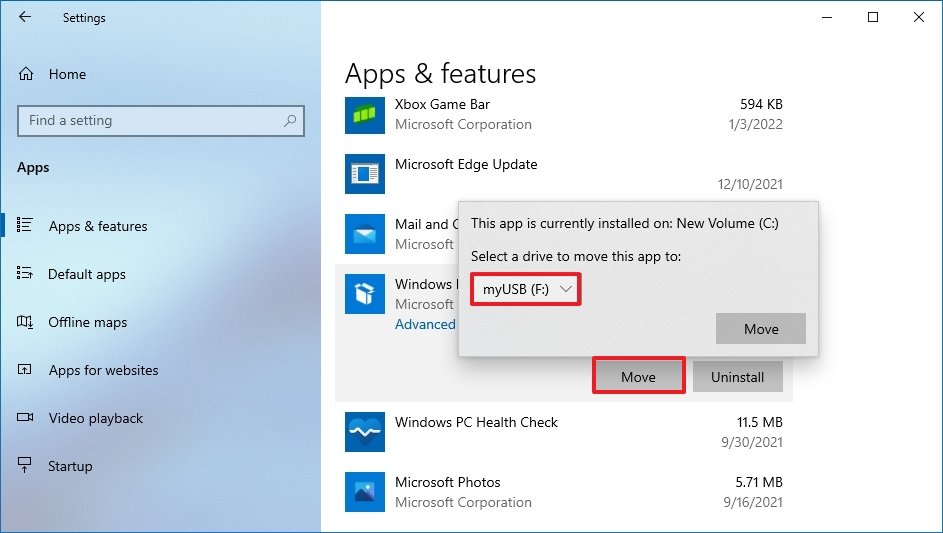 Source: Windows Central
 - Click the Motility button again.

Later on you complete the steps, you may demand to echo the aforementioned instructions to movement additional apps or games to the new location.
When using this feature, the external drive must always be connected to the device. Otherwise, you won't be able to launch the apps or play those games yous moved to the new storage.
7. Free up space using NTFS pinch
You can also use the compression feature role of the NT File System (NTFS) to reduce the storage usage of current files maintaining normal access without the need to aught your files. The feature is bachelor to compress files, folders, or the entire drive.
Important: Information compression can negatively impact system operation every bit it has to compress and decompress data on the wing. You lot should use this pick only if you do not have another pick or have capable hardware.
Enable folder pinch
To enable Windows 10 NTFS compression for a folder, employ these steps:
- Open File Explorer.
- Scan to the folder to compress.
- Right-click the folder and select the Properties option.
-
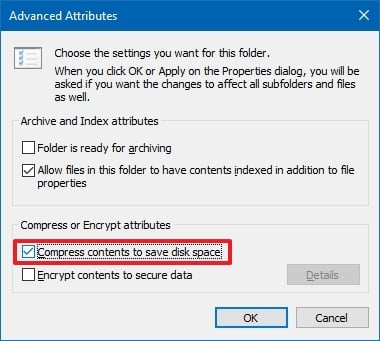
Click the Advanced button.
 Source: Windows Central
 - Under the "Compress or Encrypt attributes" department, cheque the Compress contents to save disk space choice.
-
Click the OK push button.
 Source: Windows Central
 - Click the Apply button.
-
Select the Apply changes to this folder, subfolders and files option.
Quick note: If the folder already contains files, the initial pinch can take time.
- Click the OK button.
- Click the OK button once again.


Later on you consummate the steps, the file compression feature volition enable reducing the size of existing and future files. (The above steps focus on folders, but the same instructions apply to compress files individually.)
If you no longer desire to utilize file compression, y'all can revert the changes using the same instructions, merely on step 5, brand certain to clear the Compress contents to relieve disk space selection.
Enable drive pinch
To enable NTFS compression for the entire drive, use these steps:
- Open up File Explorer.
- Click on This PC from the left pane.
- Under the "Devices and drives" department, right-click the drive to compress and select the Properties option.
-
Check the Compress this drive to relieve deejay space option.
 Source: Windows Primal
 Quick tip: Since compressing the installation drive tin can negatively affect functioning, effort using this feature only on a secondary drive or sectionalisation.
- Click the Apply push.
- Select the Employ changes to drive (drive letter), subfolders, and files option.
- Click the OK button.
- Click the OK button once again.

Once you complete the steps, the file arrangement will shrink the drive and any content already on the storage without reformatting.
When the feature is no longer needed, you can apply the aforementioned instructions to disable pinch, but on stride 4, brand sure to articulate the Compress this drive to salvage disk space selection.
8. Free up infinite disabling Hibernation on Windows 10
Hibernation is a not bad feature available on Windows 10, which saves the data in retentiveness onto the system drive before shutting down to preserve the current session upon resume. When the device comes dorsum online, you tin choice up where you left off.
Although information technology is a user-friendly feature, it requires gigabytes of space to save the memory information into the hiberfil.sys file. If the device is running out of room, disabling Hibernation can help gratuitous up space for more than critical files.
To disable Hibernation on Windows 10 to free up space, utilise these steps:
- Open Start.
- Search for Control Prompt, right-click the top upshot, and select the Run as administrator option.
-
Type the following command to disable Hibernation on Windows ten and press Enter:
powercfg /hibernate off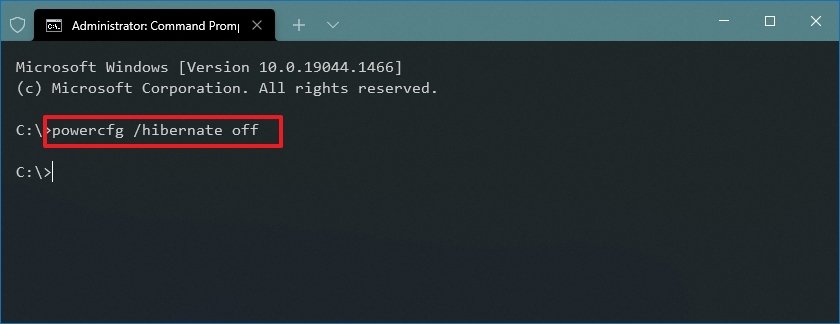 Source: Windows Cardinal

Once you complete the steps, Hibernation will no longer be available, just you will accept more space for other files.
In the future, you tin can e'er re-enable the feature with the same instructions, just on step iii, make certain to use the powercfg /hibernate on control.
nine. Costless up infinite compressing installation footprint of Windows 10
Compact OS is a tool that compresses the footprint of Windows ten and apps. The feature is meant for devices with limited storage, but you tin utilize the tool to quickly repossess a few gigabytes of space when y'all do not have external storage.
Warning: This is a friendly reminder that modifying system files is risky, and it can cause irreversible damage to your installation if you do not do information technology correctly. Before proceeding, it is recommended to make a temporary full fill-in of your PC.
To shrink the size of the Windows 10 installation and apps, utilise these steps:
- Open Start.
- Search for Command Prompt, correct-click the summit outcome, and select the Run equally administrator option.
-
Blazon the post-obit command to enable Shrink OS and press Enter:
meaty.exe /compactOS:always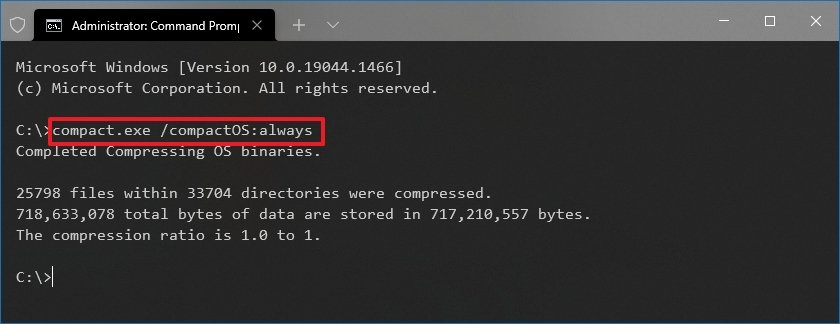 Source: Windows Central

Afterward you complete the steps, the procedure will reclaim around 2GB of storage, slightly affecting performance.
When the feature is no longer needed, y'all can always revert the changes using the same instructions, but on step three, brand sure to employ the meaty.exe /compactOS:never command.
x. Free up space rebuilding search indexer on Windows x
The Windows Search database tin sometimes grow very big for the amount of content that needs indexing or indexing issues, and it can be 1 of the cases the system bulldoze is running out of infinite. If this is the case, clearing and rebuilding the database and modifying the index items tin can significantly reduce storage usage.
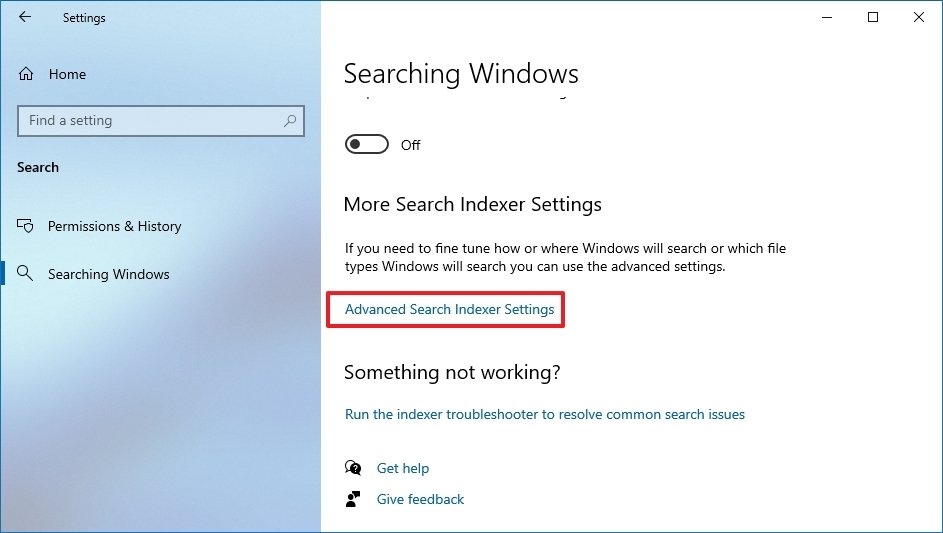
To rebuild the index of Windows ten, use these steps:
- Open Settings.
- Click on Search.
- Click on Searching Windows.
-
Nether the "More than Search Indexer Settings" section, click the Avant-garde Search Indexer Settings selection.
 Source: Windows Key
 - Click the Advanced button.
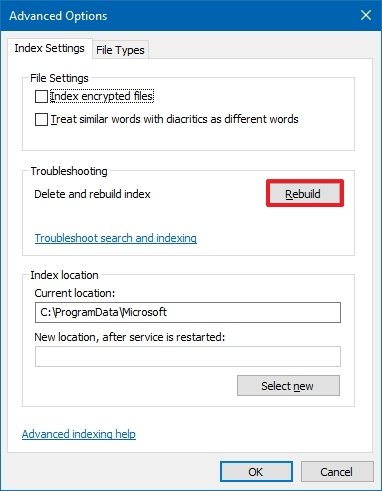
- Click the Index Settings tab.
-
Nether the "Troubleshooting" section, click the Rebuild button.
 Source: Windows Central
 - Click the OK push.


Once you consummate the steps, the system will articulate and rebuild the Windows Search characteristic'due south index database.
The only caveat with this process is that during the rebuild, searches using the Taskbar, File Explorer, and across the experience might be incomplete until files are re-indexed.
Configure indexer
You can too minimize the space past preventing Windows Search from indexing specific locations.
To remove indexing binder locations from Windows Search, use these steps:
- Open Settings.
- Click on Search.
- Click on Searching Windows.
-
Nether the "More than Search Indexer Settings" department, click the Advanced Search Indexer Settings option.
Source: Windows Cardinal - Click the Modify push.
- Click the Testify all locations button.
-
Articulate the options for apps to exclude from the alphabetize database.
Quick note: By and large speaking, y'all never want to index any kind of awarding.
-
Aggrandize the C: drive and clear the folder you lot practise not wish to appear in search to reduce the database storage usage.
 Source: Windows Central
 - Click the OK button.
- Click the Close button.

After you complete the steps, Windows Search will update the database, hopefully reducing its footprint, and making space for other files.
eleven. Free up space deleting users no longer sharing device
If yous share a computer with other people, it may be possible to free up space by deleting accounts that no ane is using anymore.
To delete user accounts and information on Windows ten, use these steps:
- Open Settings.
- Click on Accounts.
- Click on Family unit & other users.
- Select the account no longer in apply.
-
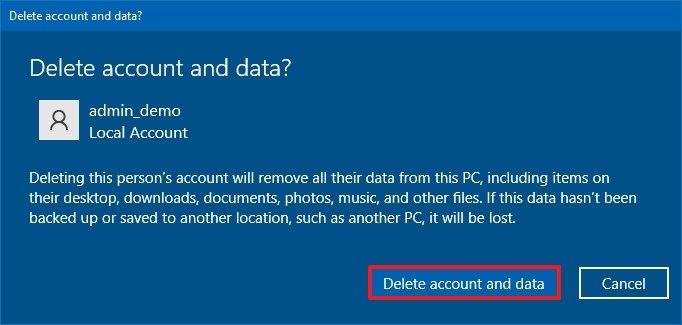
Click the Remove button.
 Source: Windows Primal
 -
Click the Delete account and data button.
 Source: Windows Central


Once you complete the steps, the profile and data will be removed from the computer, regaining more space for other files. You may demand to repeat the steps to delete other accounts.
12. Gratis up infinite disabling Reserved Storage on Windows 10
Windows 10 also includes "Reserved Storage," a feature that sets autonomously several gigabytes of space for updates, organization enshroud, and temporary files. When new updates are available, the system will automatically clean upwardly the storage to minimize issues during other updates.
Although this is a useful feature to minimize problems during updates and upgrades, it takes away space you could utilise to store more documents, pictures, and videos. If you lot sympathize the feature and prefer not to use it, you can disable it to free up additional space. The only caveat with this method is that once yous disable the characteristic, the changes will utilize during the next feature update of Windows.
Important: Only use these instructions if y'all sympathize the feature. Otherwise, it is not recommended to disable Reserved Storage because the chances of issues during an update will be higher.
To disable Reserved Storage on Windows 10, use these steps:
- Open Offset.
- Search for PowerShell, right-click the top result, and select the Run as administrator option.
-
Type the following command to confirm whether the feature is enabled and press Enter:
Get-WindowsReservedStorageState -
Type the following control to disable the feature and press Enter:
Set-WindowsReservedStorageState -State disabled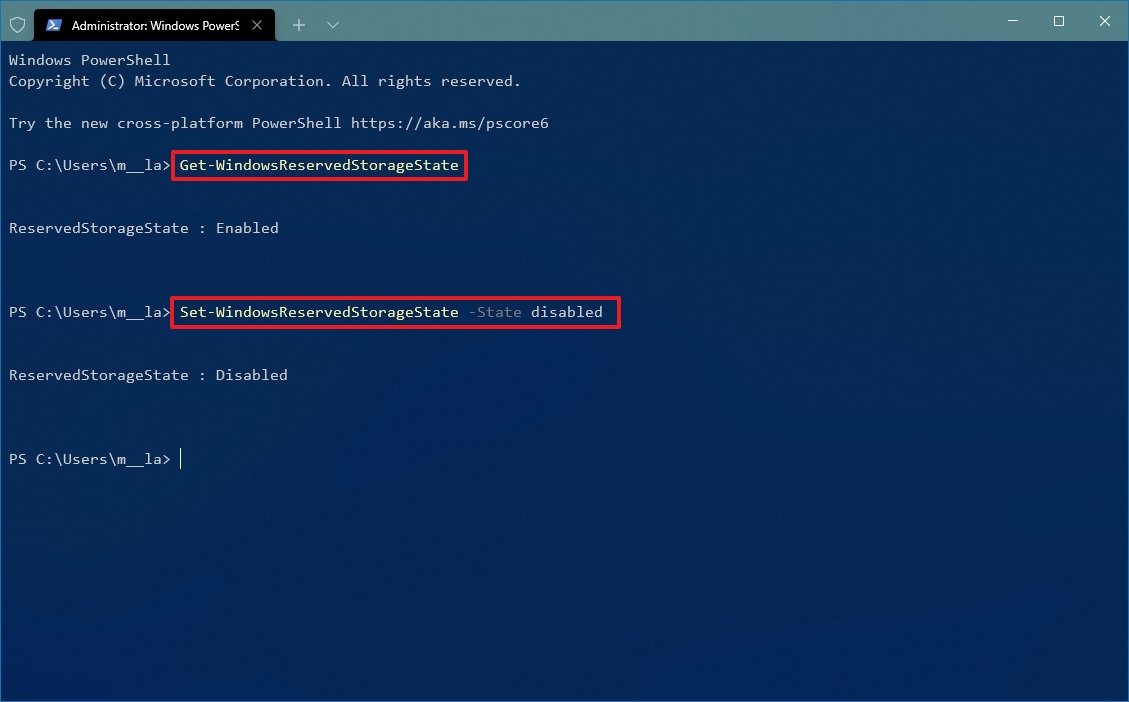 Source: Windows Fundamental

After you consummate the steps, Reserved Storage volition disable on Windows 10, allowing yous to reclaim around 7GB of infinite after the next feature update of Windows 10.
In add-on to all these different means to free up drive infinite, sometimes malware tin cause storage problems. If you lot discover strange behaviors and the hard drive is running low in infinite, a virus may be causing the trouble. If this is the case, you lot can use these instructions to browse, detect, and remove any malware causing storage issues.
More Windows resource
For more helpful articles, coverage, and answers to mutual questions almost Windows ten and Windows xi, visit the following resource:
- Windows xi on Windows Cardinal — All you need to know
- Windows 11 help, tips, and tricks
- Windows ten on Windows Central — All you demand to know
We may earn a committee for purchases using our links. Learn more than.

Room to grow
Here'southward how Forza Horizon five could exist fifty-fifty improve
Forza Horizon five is one of the best games of 2021, and ane of the greatest racing games you can play. It'south certainly not perfect, though, with plenty of areas with room for improvement. Here are five things Forza Horizon 5 could practise ameliorate.

Fun in the snow
Review: Shredders on Xbox is a honey letter to snowboarding
Shredders is an Xbox panel exclusive launching day and engagement into Xbox Game Pass, and lets players alive out their greatest fantasies of existence a professional person snowboarder. Despite some functioning issues, Shredders largely succeeds at enabling epic fun in the snow.
Source: https://www.windowscentral.com/best-ways-to-free-hard-drive-space-windows-10
0 Response to "How to See Whats Taking Up Space on Windows"
Post a Comment